Travel Diary: Quebec City + Montreal

If you follow me on Instagram you will will have seen that I was in Quebec City this past weekend, and even made a quick pitstop in Montreal. I've been wanting to visit these cities for a while now and I had a ton of fun. It's amazing to see how much culture can change within the same country. A few hours drive (which felt like an eternity) and you were hearing people speak in a completely different language... love it! Here are some pictures from the trip and a few things that happened along the way. 

First off, these will all be pictures taken with my phone's camera because silly old me left the DSLR at home. Yeah, not a fun way to start the trip but I must say it all worked out in the end. I was really disappointed when we were already 45 mins away from home and I realized that I hadn't packed it but it taught me something. As much as you plan in life, things can slip through the cracks and we can't always control everything. So, I could either let it put a damper on the whole trip or embrace it and enjoy the experience. (fyi, I chose the latter!)

Day One: Spent the day in the car on the way to Quebec, reading the August issue of Allure which I loved, and listening to music. Just before evening, we had finally made it, checked into the hotel and started walking around Old Quebec to see the city as the sun was setting. I was completely in love from the first moment. Old European influences, colourful doors, tons of cute little restaurants. As close as you'll get to being in Europe within Canada so it was pretty magical! Once the sun had gone down and everything was lit up, oh boy was it even more beautiful. The Chateau Frontenac looked incredible. 


Chateau Frontenac at night!
Overlooking the St.Lawrence River
Day Two: We went to breakfast at Paillard which is a really cute bakery on St. Jean St and then made the drive to see Montmercy Falls and the Basilica of Sainte-Anne-De-Beaupre which was so beautifully decorated in mosaic tiles. Once we came back, we walked around the Petit Champlain area and saw Place Royale then headed to dinner at Cochon Dingue which had some really yummy Steak Frites, my fave. 


Montmercy Manor!

Gelato is always a good idea ;)
Day Three: We left Quebec City and drove to Montreal for a quick stop to see the Old Port and look over the city atop Mont-Royal. By mid afternoon we were headed home.... which took ages because of traffic! All in all, it was a really fun weekend and I would totally recommend going to Quebec. Now, I have to see Quebec City in the wintertime! 

Loving the cobblestone streets!

Overlooking Montreal on Mont-Royal


Hope you enjoyed those pictures! Anywhere interesting you've travelled to this Summer?

post signature

The Summertime Base: Matte & Long Lasting

There's a lot to love about Summer, but one thing that I could definitely go without is the crazy amount of heat which leads to my face looking like an oil slick. Oh boy, is that annoying. I have combo/oily skin during the colder months, but when Summer hits there is just no shortage of oil production and my makeup slipping and sliding everywhere. Not a good look. So, after a few months of testing out different combinations of foundations and primers, I want to share with you the combo that keeps my skin looking matte for the whole day. (side note: if your skin is super oily all year round, this duo will be perfect no matter what season it is!)

If there's something that I get asked the most beauty-wise it's if using a primer is worth it. I myself was never much a primer lover. I found the added step to be redundant and time consuming but once I found one I loved, there's just no going back. Sure you can skip it if you're in a rush but when the task at hand is to keep your foundation/base products on for as long as possible, it's an incredibly essential step. This summer I've been loving the Smashbox Photo Matte Primer for my t-zone. Just a small amount massaged into the skin gives your skin a super smooth canvas that allows your foundation to glide on evenly. I also find that this primer in particular helps my foundation to not break up as much during the day when the sun starts beaming down. (I can't seem to find a link to this primer anywhere so I'm not sure if it's discontinued... if that's the case then I'd be really sad about that!) Another primer I love is the Benefit POREfessional, not as oil controlling but it makes your skin smooth and helps your foundation last a lot longer! 

Oh, this foundation. I looked at it for years, tested it out and never bought it, but after using it for the last few months, this will definitely be one I use every summer without fail. The Make Up For Ever Mat Velvet + Mattifying Foundation is a medium to full coverage buildable foundation that controls shine and is water resistant and oil free. I would not recommend this for anyone that has dry skin but if you want your foundation to last all day and combat oiliness, this is your guy! A little of this goes a super long way and I find that it looks best when really buffed into the skin. If you don't like anything full coverage then this will not fit the bill for you but I definitely think it feels more lightweight than expected. When I bought this I thought it would be extremely heavy feeling, but in reality, it didn't feel that bad. It won't feel as lightweight as other options but with the amount of coverage this gives, I didn't expect that anyways. I have the shade 35 in this but as I got more tanned, that shade became too light. I may have to go in to pick a shade or two darker! 

Those are my picks for a mattifying, long lasting base duo this Summer. If you have any recommendations for products that fit this category I'd love to know in the comments below! 

post signature

Maybelline The Nudes Palette: Worth The Hype?

Remember that time I did a post saying I wasn't really into the whole eyeshadow thang? Well, times have certainly changed and in the next week or so you're gonna get a few posts coming at you about some recent eyeshadow palette purchases, starting off with this drugstore offering from Maybelline!

When I heard that a drugstore brand was coming out with a full on eyeshadow palette, I had a little freakout sesh. This is the first and only palette of its kind that I've found at the drugstore, since you can usually only find trios and quads. Similar to the concept of the ever so popular Urban Decay Naked palettes, the Maybelline The Nudes palette offers 12 neutral shadows, varying from cool to warm tones and mattes to shimmers for the reasonable price tag of about $15 (probably cheaper if you live in the States!) If that doesn't sound good to you then I don't know what will. Now, let's get into an in depth review of what I truly think about this palette. 

First off, the packaging. For the price tag you really can't expect a very luxe case for these shadows, so the plastic outer shell, while not luxurious, is sleek looking and sturdy enough to protect your shadows from cracking. I do like that it's simple and black and resembles a more expensive option. The biggest gripe I have with the packaging is the lack of a mirror. While I usually use a bathroom mirror or my vanity to get ready, it would be nice to have a mirror inside in case you're travelling or need to touch up your look if you decide to smoke out your shadow for a nighttime appropriate eye. Oh, and I would've appreciated if these shades had their own names because then I wouldn't have as much trouble naming each one - "the third shadow in the bottom row" just doesn't have a nice ring to it!

The eyeshadows themselves are a bit of a hit or miss. They're not all beautifully pigmented and buttery to the touch but some shades do perform better than others. I found that most of the shades on the top row of the palette needed to be packed on heavily to get a decent colour payoff except for the star of the show which is that deep bronze shade (4th on the top). That bronze is the standout of the entire palette and I'd probably buy the palette just for that shade. You can see it in action in my latest video! As for the bottom row, the first shade to the left is basically the powder eyeshadow version of the Maybelline Colour Tattoo in Bad To The Bronze, so layering them gives you much better pigmentation! The light gold is decent but I would've definitely loved to see a more richly pigmented finish like the bronze shade on the top row. The fifth shadow on the bottom row is very disappointing and it barely shows up on the lid, so this one needs some definite work to get it to show up. Lastly, the black in the palette isn't very dark, it resembles more of a deep grey, but I think that might be a good thing if you're a beginner so that you don't get too dark of a look, too quickly. I do like that the palette has a variety of cool and warm shades so that you get a bit more versatility but some of the essential shades to create these looks need a lot of work to get them to standout, which is a major bummer.

I definitely like this palette. I can see myself reaching for it because of certain shades within the palette but I wouldn't be completely content with just this palette in my makeup stash. If you're looking for a drugstore addition to incorporate into your eyeshadow selection, this isn't an awful choice! 

So you're not getting a palette filled with highly pigmented, creamy shadows all-round, but some of the shades do work better than others. If you have other eyeshadow palettes that you just love, this may not wow you, but for the price this is an awesome palette for someone who is starting out with makeup and wants to dip their toes into the eyeshadow waters but doesn't want to spend tons of money. Hopefully more drugstore brands jump on the bandwagon and come out with full-size eyeshadow palettes like these. That would make for an interesting palette battle, huh?

post signature

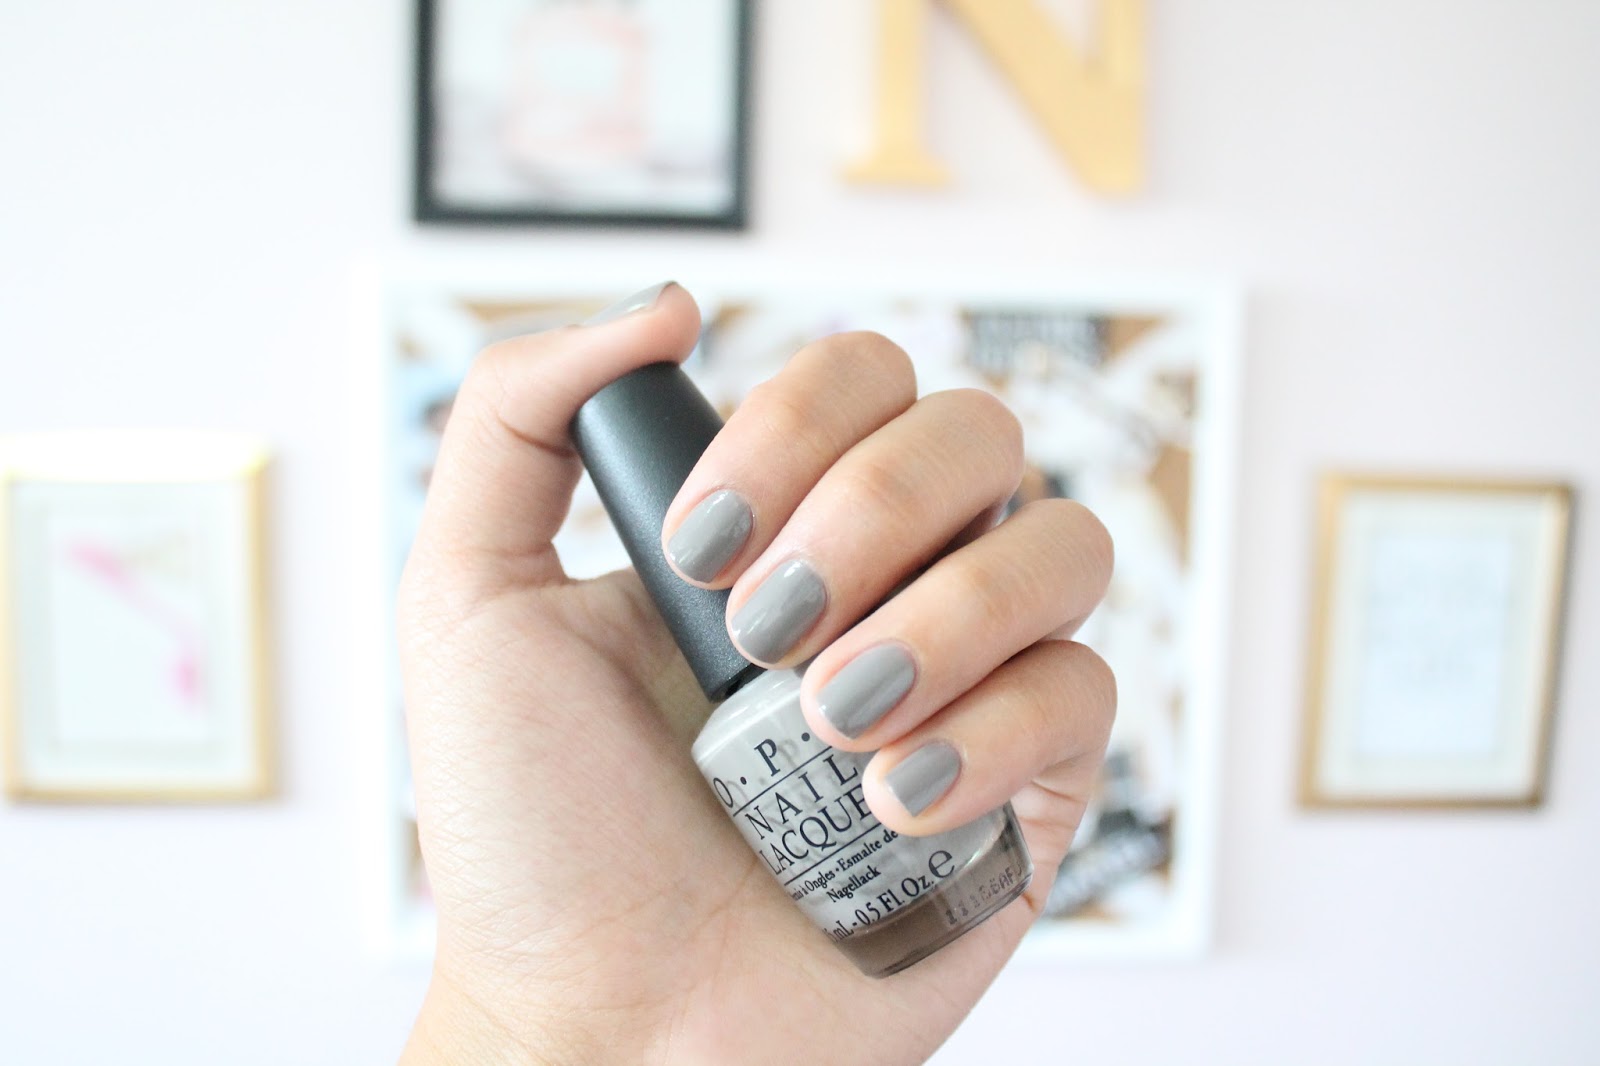
NOTD: OPI French Quarter For Your Thoughts


It may still be technically summer, but the weather around these parts has been stating otherwise. It's the middle of August and temperatures seem to be dropping at alarmingly fast rates. I love the fall, don't get me wrong, but there's something unsettling about having bought a million rompers and it being too cold to even wear them. 

As indicated by the weather chance, my nail polish tastes are starting to make the summer to fall shift and every year for the past three years I always turn to OPI French Quarter For Your Thoughts! It's a mid tone grey shade that is beautifully creamy and goes on opaque in two coats. It's perfect if you love neutrals but you want to make the change into the more cool side of the colour spectrum. It leaves your hands looking polished and clean, doesn't clash with your outfits, and is ideal as a transitional colour. 

Any polishes that you love when moving from summer to fall? I honestly can't believe Autumn is almost here, I have three weeks before I go back to uni and at the end of September I will have had this little blog for a whole year! *gasp* Time flies by, huh?

post signature

The Video: Bronzed Summer Makeup


So, you're probably saying "hey stranger!" It's definitely been way too long since I've posted. But I'm back and ready for some serious business. 

I filmed this video on my go-to summery, bronzed eye and pinky peach lip combo - one of my faves! It was really fun to film a more in depth makeup tutorial and I even threw in some bloopers at the end. Hope you guys enjoy this look and are excited for new things coming your way in the coming weeks! 

post signature

Two Makeup Tools Everyone Needs

That's quite the title for a beauty post, huh? After a few weeks of playing around with these two beauty tools, I can honestly say that I would never go back to not having them around. Why might you ask? Because they make your life so much easier! 

Let's start off with that little egg shaped, pink sponge. You've probably seen it before and thought that it's so overpriced (which it kinda is but that's besides the point) but the BeautyBlender is essential for making your base look like skin. I have no idea what it is about it but once dampened, it's able to seamlessly spread out foundation and concealer and press it into the skin so as to not have a masking effect. You avoid any harsh streaks that could come out of using a generic foundation brush and you get a natural look even from higher coverage foundations! Magical I tell you. My biggest tips would be to always use this sponge after it has been soaked in water and rung out - it will prevent the sponge from sucking up all of your foundation. On that same note, I think you get the best results when using a foundation that has a bit more of a thick consistency. Something like the Chanel Perfection Lumiere Velvet is so liquidy that it'll be soaked into the sponge. Just like any of your brushes, always wash this after you use it. With my other brushes I tend to wash them every week, but I wash my BeautyBlender after each use because I want to prevent it from getting stained and from sitting around collecting bacteria. Cleaning it is super simple - take a small blob of cleaner onto the sponge and gently massage it in. Then all you need to do is rinse it out well with water until the water is clear and let it dry. All in all, such a good makeup tool!

I feel like I'm going to talk about the MAC 217 for the rest of my life and make everyone I know get it. This brush is the most useful one I have in terms of eye brushes because it does it all - buffs shadows onto the lid, it's perfect for adding depth into the crease and it blends out all of your shadows to prevent any rough edges. It's amazing! This is my first MAC brush and I must say, you get what you pay for. Sure, it's more expensive than ones you can get at the drugstore, but the quality is impeccable. You could easily have two or three of these in your collection and it wouldn't be a waste because they're so multipurpose and will last you ages. If I had to recommend one eyeshadow brush to you, hands down it would be the MAC 217. 

While getting makeup is exciting, you can't forget about the tools you use to apply it with and these two are my absolute loves! If you have them, let me know your opinions and send some more recommendations my way of tools you just can't live without. 

post signature
Blog Content. © Glorious Peonies | A Lifestyle And Beauty Blog . Blog Template All rights reserved. © Maira Gall.